 |
|
|
|
#1
|
|||
|
|||
|
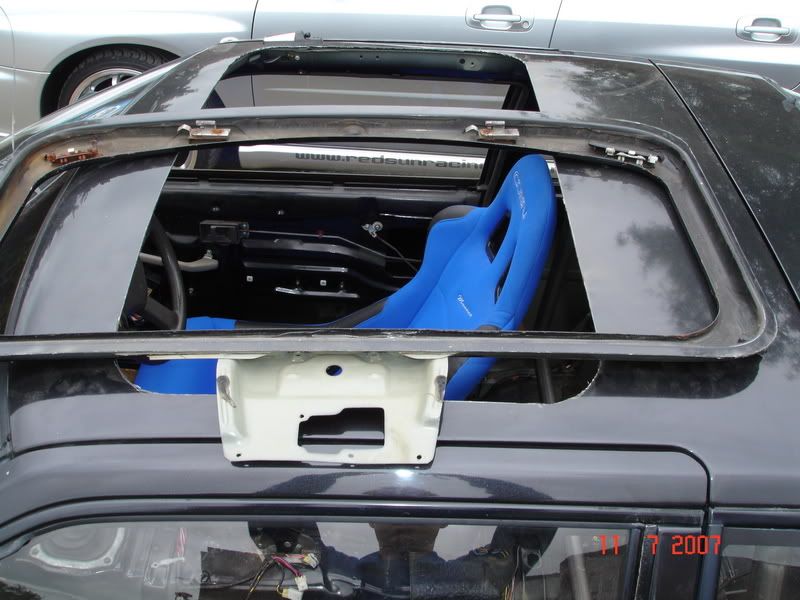
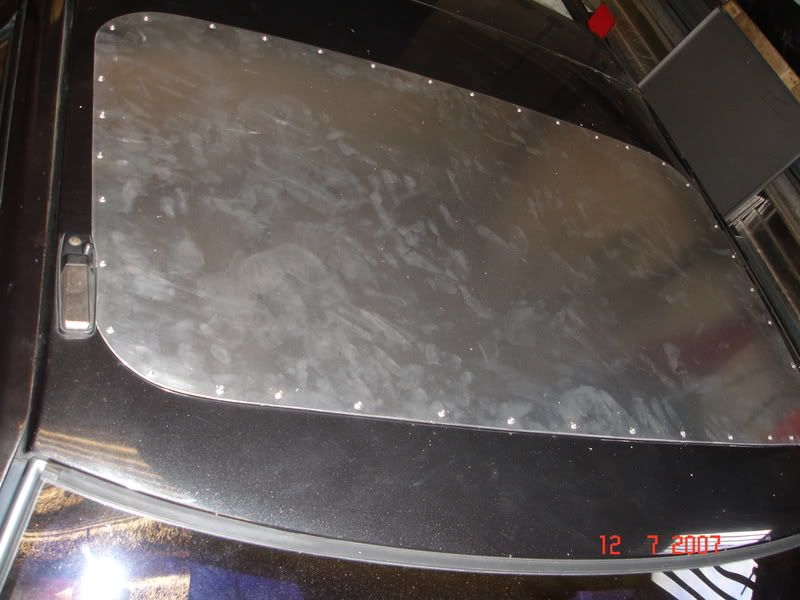
Here's how to chop the sunroof out, as on my trackday car. This made the car a bit stiffer, lighter and made more room for the cage.
First thing to do is to look at the form of the steel on the underside, so the roof lining has to come out. It's also a fire risk!! I used a centre punch and a hammer to lightly tap dents into the roof sheet on the perimeter of the sun roof tray so it can be seen from the top side. Make sure there are no electrics in the way & disconnect the draining hoses. Once this is done put an old bed sheet accross one door and drape it so it's loosely under the roof, hook it over the other door and shut. This should catch most of the sparks and bits. Now most of us have done dot-to-dot at some point...right!!  Now you will need a disc cutter & some goggles for the straight bits, (tip is to take your time and let the disc cut & watch your fingers!!). Now you need a jigsaw to do the curved bits best.( tip here is to use masking tape to ensure you don't damage the paint work & again..take your time! ) The sheet should catch it when you cut through, though I would recomend having some one inside to support it on the last bit as it bends the roof as it droops with the weight. Time for a cup of english tea!!! Have a tidy up & de-burr the edges with a small hand file. I chose a piece of thin aluminium sheet to patch the hole up. Lay this over the hole on top, getting someone to put some weight on it while you go around with a marker pen of some type underneath. You need to make it about 20mm bigger all around. I would at this point apply a little paint & allow to dry while you do the next bit.  Cut this shape out allowing for the external ariel and de-burr. Apply some neoprene gasket to the underside of the sheet or silicone sealant will do, but you need to be quick on the next bit. Next you need a helper again to hold the sheet in position while you drill 3.2mm holes and pop rivet the sheet in place( tip here is to drill one hole pop rivet it and move on to the next & so on.)  The final job is a coat of paint. Lovely...you can sit down now. 
|
|
#2
|
||||
|
||||
|
Nice "how to" mate, looks like a really neat job with the cutting there
 . .I guess if you wanted a perfect roofline, the edges could be filled and rubbed down or even cut the donor section so that it follows the edges right to each door line, the front screen and rear hatch section (not forgetting a cut out for the aerial if it`s still needed). Looking good though, you`ve done a lot of work on the old girl  . .Regards, Ian.
__________________

|
|
#3
|
|||
|
|||
|
Oh man, i was kinda preying for a 'how to' with an axe!
Good job though, if you wana tint the windows, i know a 'how to' with a lighter and newspaper. 
|
|
#4
|
|||
|
|||
|
LOL... I nearly wet myself laughing...is it that basic?
Sorry guys remove the thread if you think it's not appropriate. Hans. |
|
#5
|
||||
|
||||
|
No seriously, I think you`ve done a really good job there, honestly
 . .I added the extra tidying up bit, as I was thinking about road car use, rather than a track day bruiser...LOL.....  @ Dazz....LOL..... @ Dazz....LOL.....Regards, Ian.
__________________

|
 |
| Thread Tools | |
| Display Modes | |
|
|